Why we need to perform this activity: When we are facing space issue on server because of data increment we need more space on server so we can increase server Hard Disk through LVM.
Step Need to perform in this activity -
1. Add new hard disk in server
2. scan new hard disk for visibility
3. Create New partition
4. Convert partition in physical volume
5. Add new physical volume in volume group
6. Increase Logical Volume
Let's do this activity step by step
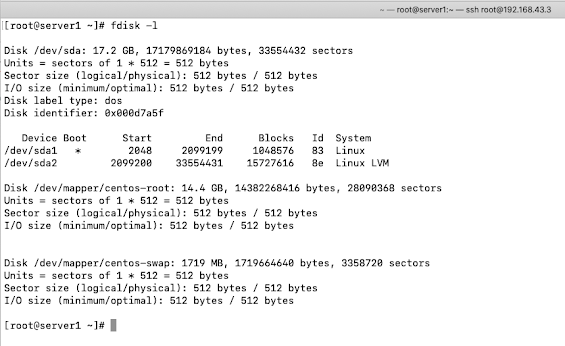
Check current status of HDD
* To check current status of HDD you can use below command
# fdisk -l
* Verify current available space on server
#df -h
* Check existing data
# mkdir /opt/mydata
# echo "https://www.makelinuxinteresting.com/" > /opt/mydata/test.txt
# cat /opt/mydata/test.txt
1. Now add new hard disk in server : Now added 5 GB hard disk in server
2. Now scan hard disk for Availability
Note : After adding new hard you can reboot your server to get HDD reflected or you can scan your Hard Disk from command given below .
* Check available host in server
#ls /sys/class/scsi_host/
* Now scan all available host one by one
#echo "- - -" > /sys/class/scsi_host/host0/scan
# echo "- - -" > /sys/class/scsi_host/host1/scan
# echo "- - -" > /sys/class/scsi_host/host2/scan
# echo "- - -" > /sys/class/scsi_host/host3/scan
* Now check new hard disk is showing or not
# fdisk -l
3. Now create partition in new hard disk by fdisk command
# fdisk /dev/sdb
: n ( Press n for New partation)
: p (Press p to select primary
: Press Enter to select default value
: Press Enter to select default value
: w ( Press w to write change)
* Now verify new created partition
# fdisk -l /dev/sdb
4. Now convert partition in physical volume
# pvcreate /dev/sdb1
5. Now add new physical volume in volume group
* check group volume
# vgdisplay
* Now extend volume group
# vgextend centos /dev/sdb1
Note here centos is VG name so change according to your requirement
* Now check volume group available space
#vgdisplay
6. Increase Logical Volume
* Check logical volume name
#lvdisplay
* Now extend partition
# lvextend -l +100%Free /dev/centos/root
* Now resize changes
Note: Here make sure you run command according to OS version
> For Centos 6
resize2fs lvname
# resize2fs /dev/centos/root
> For Centos 7
# xfs_growfs /dev/centos/root
* Now check space on server
# df -h
Now check total available space is increased
Now enjoy


